How to Style Charm Bracelets and Necklaces

While I know that every trend comes back into style, I never expected the matching charm BFF necklaces that I wore in elementary school making a comeback. The charm jewelry trend is an elevated version of the charm jewelry making kits when you were a kid. By wearing charm jewelry, you can completely personalize your style and display charms that are uniquely you.

From initial charms to stackable jewels, charm jewelry is the ultimate accessory to show off your meaningful memories. We got the full rundown on this trend from two fashion stylists.

What Is the Charm Jewelry Trend?

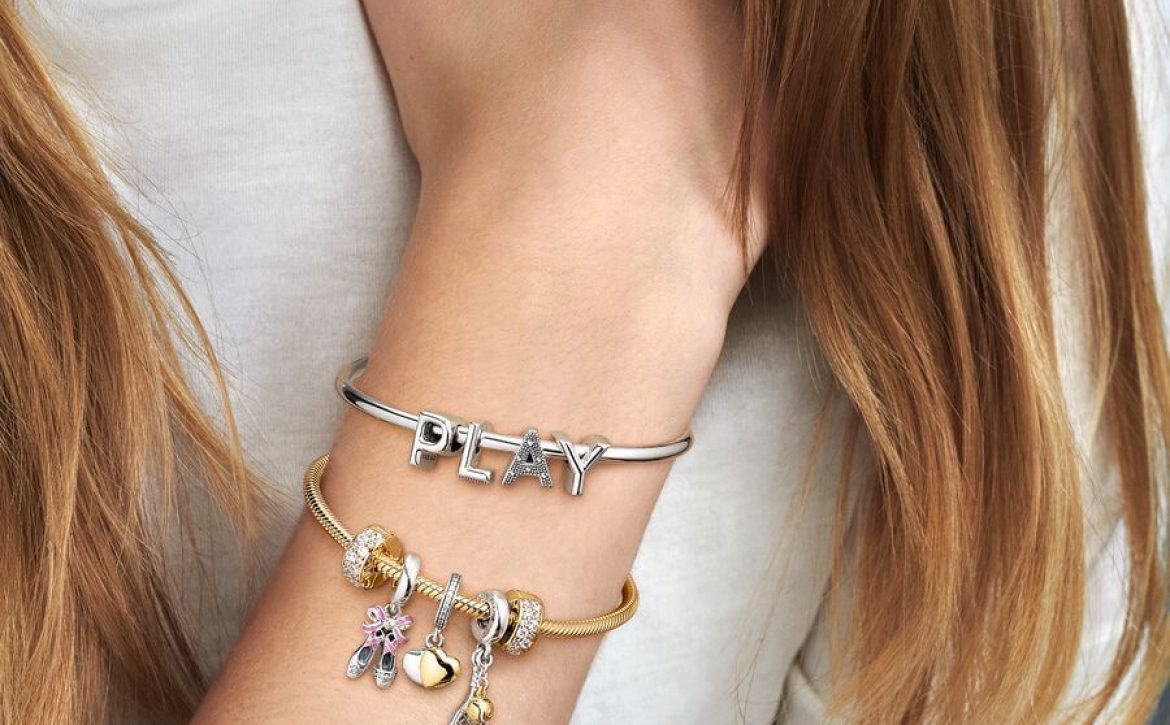
“What we love about charm jewelry is that the charms can carry personal or sentimental meaning in addition to being a trendy way to add something fun and unexpected to a look,” explains Dani and Alix, celebrity fashion stylist duo. Most charm jewelry can be stackable with personal jeweled ornaments, charms, or decorative pendants.

Different Types of Jewelry Charms

The possibilities are endless when it comes to jewelry charms. Jewelry charms can come in all colors, shapes, and sizes. These charms can be simple, formal, or personalized to your own memories and style.

“We love charms that have meaning, whether that be numbers that link to a specific date, angel numbers, or lucky numbers. We’re also big on anything ‘puffy’ like hearts or bubble letters, especially for spring and summer,” explains Dani and Alix. Even items such as fruit can be a jewelry charm (one of Dani and Alix’s personal favorites are cherry charms).

How to Style Charm Jewelry

If you’re in need of a statement piece to spice up a basic outfit, add charm jewelry to your wardrobe. “When styling charm bracelets and necklaces, our goal is to have the accessories be the focal point of the outfit,” says Dani and Alix. Follow these tips to incorporate charm jewelry into your outfits.

  • Plain White Tee and Baggy Denim: Keep it casual by pairing your favorite white tee and oversized denim with charm jewelry. Dani and Alix recommend styling charm jewelry with a plain baby tee to draw attention to the jewelry charms in your look.
  • T-Shirt Dress: Add charm jewelry into a t-shirt dress outfit to bring a new take to a simple and casual look. This look can easily be dressed up or down depending on the charm jewelry accessory.
  • High Neck Tank and Midi Skirt: Pair a high neck tank, midi skirt, and charm jewelry for an elevated casual look. Whether you’re off to a shopping day or lunch date, this cute casual style will be complete with charm jewelry accessories.
  • High Neck Maxi Dress: If you have to dress for cocktail attire, consider adding charm bracelets to your ensemble. This creates a bold statement and allows you to show off your jewelry. Shop for charms that have an elevated, refined look for special occasion wear.
  • Little Black Dress: Grab this capsule wardrobe staple and mix it up by adding charm jewelry. For special occasion style, look for a statement charm necklace. This combination brings a fresh take to a classic outfit.

Where to Shop

Whether you’re looking to create your own customizable charm necklace or want elevated charm jewelry, we’ve got you covered. Check out these expert-approved shops for charm jewelry.

  • Bonbon Whims Cherub Bracelet: This Cherub Bracelet by Bonbon Whims ($68, bonbonwhims.com) is a staple charm bracelet with the iridescent heart charm and gold circle charm. “We love the brand’s use of color and their signature charms to give an outfit a unique spin,” explains Dani and Alix.
  • Glaze Jewelry CZ Lock Charm Necklace: The Glaze Jewelry CZ Lock Charm Necklace ($79.97, nordstormrack.com) is a perfect option for jewelry fans of the lock charm. This style includes multiple lock-shaped charms with cubic zirconia accents.
  • Jenny Bird Puffy Heart Bracelet: The Puffy Heart Bracelet by Jenny Bird ($138, revolve.com) includes gold-tone metal and a puffed heart charm. Dani and Alix recommend stacking gold and silver charm bracelet styles for a mixed metal look.
  • Ben-Amun Multi-Locket Necklace: If you’re looking a classic statement jewelry piece, this Multi-Locket Necklace by Ben-Amun ($320, neimanmarcus.com) features various charm locket styles for a bold look.
  • Brooklyn Charm: For a customizable charm jewelry experience, check out Brooklyn Charm in New York City and Los Angeles. They offer an array of charms for customers to choose from and you can create your own charm bracelets, necklaces, and more.


Read More

‘Cowboy Core’ Is the Latest Clothing Trend—Get the Look

If you think you’ve been seeing a recent rise in cowboy chic fashion, you might just be onto something. It seems ever since BeyoncÃĐ appeared on the country music scene, cowboy hats have been popping up everywhere. 

Enter the ‘Cowboy Core’ trend. While not necessarily a brand-new trend—Western gothic was one of Pinterest’s Predicts trends for 2024—celebrities, including BeyoncÃĐ, Harry Styles, and Taylor Swift, have been making it even more popular.

We spoke to an expert in fashion (and Western design) to find out how to get the look.

What Is the ‘Cowboy Core’ Trend?

“The ‘Cowboy Core’ trend all relates to the rugged west,” says Johnetta Boone, costume designer of the show Yellowstone. America has long been enthralled by the cowboy aesthetic, wearing fashion choices that are reminiscent of those familiar Western flicks of the past and present. 

Cowboy boots and hats are the essentials for any Western-inspired look, but we’re also seeing lots of fringe, denim on denim, and buckles with vintage hardware as people make this trend their own.

“People are giving themselves license to be their own type of cowboy, on and or off the horse,” says Boone. “Not all will have the luxury of living in the lifestyle and many appreciate it so. The trend is a way of extending their appreciation.”

Tips on Adding ‘Cowboy Core’ to Your Look 

This is a trend you can go big or small with. If you’re looking to go all out, you can grab those cowboy boots and pair them with a cowgirl hat, or you can simply add one staple piece, such as a denim vest, to your wardrobe to get that Western appeal without overdoing it. Bolo ties can also make this look come together easily.

Boone recommends shopping for pieces from Western brands and Native American artisans. “Use this opportunity to give back to the families that are the true inspiration of the trend. Art imitates life,” Boone says.


Read More

A sunscreen that wears like a dream, help for at-home hair removal, an eye cream for under your eyes and on your lids, and more.

A sunscreen that wears like a dream (no white cast or stickiness!), help for at-home hair removal, an eye cream for under your eyes and on your lids, and more.  Happy shopping!

Sunny Shield

This moisturizer is just what I need to face the day. It protects against UV rays, blue light, radiation, and pollution—without leaving white streaks behind. It’s even good for oily skin.

To buy: Triple Prep Weightless Multitasking Moisturizer SPF 40, $48; supergoop.com

Smooth Operator

Say bye to unwanted body hair and hello to this easy-to-use wax. It sticks to hair, not skin, so it’s less ouchy. And it smells like mangoes.

To buy: Full On Meltdown Vegan Hard Wax, $26; crybabywax.com

Brow Booster

My tip for brows that wow: tint! It makes hairs look fuller and nixes the need to pencil. Brush on the dye (in three shades) and remove after 10 minutes for color that lasts for days but doesn’t stain.

To buy: Brow Pal, $24; hallyhair.com

A Better Base

Infused with hyaluronic acid and jojoba oil, this buildable formula blurs my lines and pores while adding a healthy sheen.

To buy: Make Up For Ever HD Skin Hydra Glow Foundation, $47; sephora.com

Sleeper Hit

The next best thing to a full night’s sleep? An eye cream that helps me fake one. This gel-cream brightens, depuff s, and minimizes lines. Best of all, it’s safe to use on the delicate upper eyelids too!

To buy: Full Orbit, $28; glossier.com

Shower Power

My five-minute shower has been feeling more spalike thanks to this luxe lather. It cleanses and moisturizes, saving me a step on hectic mornings.

To buy: Olay Indulgent Moisture Body Wash, $13; walmart.com

Read More

Brow Lamination vs. Microblading—Which Is Right For You?

While we all love the look of full brows, adding brow makeup into your morning routine every day can be way too much time and effort. Whether you want your brows to look fuller and darker, brow lamination and microblading are high-maintenance treatments that can let you live a low-maintenance lifestyle.

We asked the pros everything you need to know about brow lamination and microblading, including which brow service is right for you. 

What Is Brow Lamination?

Brow lamination is actually an eyebrow perm that relaxes coarse or curly eyebrow hair. “You get a desired look that looks a lot more full and a little more straighter. It’s really great for people who have unruly brown hair and they want it to be a little more tamed,” explains Alleni Peterson, brow artist and owner of Dollhouse Lash and Brow.

Benefits of Brow Lamination

One of the most important benefits of brow lamination is that it’s a non-invasive and pain free technique. The look of the brows really depends on the client’s consultation and wishes. This method really is a one-size-fits-all approach—Peterson says some clients want big, fluffy brows while others prefer a soft, natural look. Brow lamination can define and shape brows to appear fuller. 

What to Keep in Mind Before Getting Brow Lamination

A consultation is a crucial step before the brow lamination procedure. Peterson recommends looking for a salon that has a consultation before the appointment. This way you can talk to the artists in depth about your desired look and if it will be achievable for you. It always helps to bring inspiration photos as well.

In the brow lamination process, the lamination is obviously applied to the brow hairs, but sometimes residue can get on the skin, so it’s important to do a patch test beforehand to see how the skin will react. Peterson’s clients come in 24 to 48 hours before their brow lamination appointment for a patch test. “We require any clients who come in for a lamination to get a patch test done because it is a chemical process and we want to make sure you don’t have an allergic reaction,” says Peterson. 

Peterson recommends coming in for brow lamination six to seven weeks after the first lamination. The process lasts four to six weeks, but she suggests allowing your brows time to breathe. For aftercare, Peterson recommends applying argan or castor oil to the brows afterwards to make sure the hair doesn’t get very dry.

What Is Microblading?

“Microblading is a semi-permanent tattoo. There’s a manual pen that has multiple needles that make a blade on there. As artists we dip that blade inside a container that holds ink, and then we create an illusion of a more defined, full brow,” explains Carol White, owner of MainBrows. The blade used in the microblading method is opening up the skin, so that the ink can penetrate the skin. 

Benefits of Microblading

Like lamination, microblading saves time and money by having your brows look exactly how you want them to look. But while lamination focuses more on shape, microblading helps more with volume by giving the appearance of fuller brows. This procedure also lasts a long time (much longer than lamination), making it a good option for those who don’t want to go in for routine touch-up sessions. White explains that microblading lasts for two to four years (if you have normal to dry skin it will last about four years, while oily skin would last around two years).

What to Keep in Mind Before Getting Microblading

White explains that microblading has best results for normal to dry skin because the colors from microblading spreads out over time on oily skin. Overall, it enhances your natural brows by creating a desired shape that makes the brow look fuller and thicker. 

Anyone that is pregnant, breastfeeding, or on medication that can alter how your skin heals should stray away from microblading. White recommends consulting with your doctor first to see if microblading is a good fit for you.

Microblading vs. Brow Lamination

It really depends on many factors such as time, money, and desired appearance. If you’re looking for a more permanent, long-lasting solution, microblading lasts two to four years while brow lamination only lasts four to six weeks. However, microblading is considerably more expensive than one session of brow lamination. If you’re looking for a temporary chageup, brow lamination might be the better choice, but if you want something more one-and-done, microblading is the better alternative.

You should also take into account the look that you want. Brow lamination will give the appearance of sleek, brushed-up brows, so it’s good for people with already full brows who want a better shape. If you have thinner, sparse brows and just want the appearance of more hair, microblading probably makes more sense.


Read More

How to Apply Bronzer for a Glowy Complexion

Bronzer’s one of those “bonus” makeup items that can sometimes end up neglected at the bottom of a makeup bag (if you own one at all!). Yet, when applied well, it consistently delivers the most wow-worthy results with very minimal effort required. If you’re a bit intimidated by bronzer, we’re here to instill some confidence. We asked professional makeup products for a step-by-step rundown on how to apply bronzer the correct way so you can look glowy and gorgeous without fail. 

What Does Bronzer Do?

Bronzer’s main goal is to mimic the effect of the sun on your skin by creating a golden-y tanned effect. “Bronzers are an easy way to add a beautiful glow to the skin without the risks from sun exposure, like sunburn or even skin cancer,” notes celebrity makeup artist Sarah Egan. “Bronzers come in a variety of forms—sticks, creams and powders—and are typically formulas with some shimmer.” 

Bronzer Vs. Contour

Though often conflated, bronzer and contour aren’t necessarily the same thing. While bronzer lends a sun-kissed effect, “contour is meant to enhance the bone structure by creating or deepening shadows,” Cantor explains. The products are fundamentally different, too. While bronzer has orange and golden undertones with some built-in shimmer or radiance, contour has gray undertones and a matte finish to help mimic a shadow. 

How to Apply Powder Bronzer

Powder bronzes are applied with a big fluffy brush and blended in. “Be sure to set your liquid and cream products first before applying your powder bronzer to avoid a patchy, uneven finish,” says celebrity makeup artist Bryan Cantor. 

One of his favorites is Pat McGrath’s Skin Fetish Divine Bronzer ($39, Pat McGrath). It’s a longwear option with blurring technology and a micro-velvet finish. “It ensures a flawless application with no caking, patchiness or streaking,” he says. Another top-tier pick is the Makeup by Mario SoftSculpt Bronzer ($32, Makeup By Mario), which is a multipurpose formula available in six shades that creates a subtly bronzed complexion and soft definition. 

How to Apply Liquid or Cream Bronzer

Cream or gel bronzers are ideally applied with clean fingers, a makeup sponge, or foundation brush and blended well. “If you are applying a cream, liquid or gel bronzer, apply it before powdering and blend the edges with the leftover product on your foundation brush or sponge for a seamless finish,” Cantor says. 

For a stick bronzer option—which makes for easy application—try Rare Beauty Warm Wishes Effortless Bronzer Stick ($26, Sephora), which is one of Egan’s faves. The Chantecaille Radiance Gel Bronzer ($48, Chantecaille) is another option that offers a “weightless, luminous formula with a special polymer that gives a smooth, natural finish,” Cantor says. 

3 Bronzer Application Methods 

So what’s the correct way to apply bronzer? There are a few different approaches you can take depending on the vibe you’re going for. 

Natural, Beachy Look 

For this approach—which is perfect for everyday wear—you’ll apply the bronzer to places where the sun naturally hits your face. “Start by applying bronzer in an upside down ‘U’ shape from one temple, up along your hairline, and finishing at the other temple,” Cantor instructs. “Then, apply bronzer in a ‘W’ shape across your cheekbones and nose.” You can also apply to the tip of your chin. 

Golden Glam Aesthetic 

An alternative is to create a more dramatic look that reads high glam, which is perfect for big events. “Apply your bronzer in a ‘3’ shape on both sides of your face from your temple down around your eye and under your cheekbone, then back to just in front of your ear and down and across your jawline, stopping just before your chin,” says Cantor. You can also apply bronzer as a nose contour by creating a line of bronzer along the side of your nose. Finish by applying just a touch to your hairline. 

Body Bronzer

Bronzer is not just limited to your face; you can apply it to your body, too. Not only does it create a temporary bronzed effect, but it helps even out skin tone to blur the look of scars, veins and uneven texture. For this, you’ll choose a color that’s about one shade darker than your complexion and apply evenly. 

For a great body bronzer, check out Hi Beautiful You Be You Body Perfecting Bronzer ($57.50, Hi Beautiful You). This transfer-resistant formula glides on easily, won’t look patchy or streaky, and moisturizes. Cay Skin Isle Glow Body Lotion SPF 45 ($38, Cay Skin) is another option—it has SPF 45 to protect skin from the sun while imparting a shimmery, glowy bronzed finish.

Bronzer Application Pro Tips 

When using bronzer, follow this expert advice. 

  • Don’t Go Too Dark: “One of the most common bronzer mistakes is using a shade that is too dark,” Egan says. Instead, reach for a bronzer that’s one or two shades darker than your natural skin tone. Anything darker will look unnatural and won’t blend well. (You may need different shades depending on the time of year.) 
  • Keep Shimmer to a Minimum: Many bronzers have some built-in shimmer. For a more natural look, Egan recommends using a product with a minimal amount of radiance versus one that’s extremely shimmery or even glittery. “Over time shimmery bronzers make the skin look sweaty instead of glowy,” she warns. 
  • Only Apply to Key Areas: “A mistake that many people make when applying bronzer is to apply it all over the face instead of on key features,” Cantor says. “This creates a very fake-looking effect. If you want to look more tan all over use a sunless tanner first to deepen your skin tone, and then choose a bronzer that corresponds to your new skin tone.”


Read More

Do You Exfoliate Before or After Shaving?

Our skin constantly sheds skin cells, but as we get older the turnover rate slows down and dead skin cell buildup can occur. This results in flaky or dry-looking skin, and can also make for a lackluster appearance versus a healthy, lustrous one. Using an exfoliating product lends a helping hand to the process by sloughing off dead skin so skin can really get its glow on. 

But what’s the best way to go about it? Should you exfoliate before or after shaving? And does the order of operations change depending on the type of exfoliator you use? We’ve got all the answers. 

RELATED: 3 DIY Body Scrub Recipes You Can Easily Make at Home

Should You Exfoliate Before or After Shaving? 

Ideally, you should exfoliate before shaving. “Without exfoliation, the razor tends to get buildup and may not remove hair as efficiently or close to the skin,” notes Maya Thosani, MD, a board-certified dermatologist based in Scottsdale, Ariz. “Exfoliation also removes the dead skin that surrounds and coats the hairs, so it can seem like it lifts the hairs up for a closer shave and a smoother result.”

She adds that since freshly exfoliated skin leads to a more even skin surface, it can also help reduce nicks and cuts. Also, some exfoliants—especially chemical exfoliators and physical scrubs made with salt—can potentially irritate freshly shaved skin. And if you’ve got a fresh cut from shaving? Ouch! 

The bottom line is that no matter what kind of exfoliant you prefer, be it a superfine scrub or a product formulated with powerful acids, it’s always best to exfoliate before shaving. As for moisturizing, this is a must every time you hop out of the shower, but is particularly important post exfoliation and shaving since these two things can be drying. 

5 Benefits of Exfoliating Your Body 

If you’ve ever been on the fence about exfoliating your body (or you’re not so great at keeping a routine), here are some benefits that might just convince you to exfoliate on a regular basis. 

  • Skin Looks More Youthful: “It’s important to exfoliate your body because this regulates the amount of dead skin that sits on the surface of your skin,” notes Rachel Lozina, a licensed esthetician and founder of Blue Water Spa in Oyster Bay, New york. “If you have too much dead skin sitting on the surface of your skin, it can lead to dull, dry and older, looking skin.” 
  • Minimizes Breakouts: Those dealing with body acne can benefit from using a salicylic-based exfoliator. These help keep pores clear so you have fewer breakouts. 
  • Smoothes Skin: Exfoliants can help buff away rough texture and bumps, resulting in a smoother and more even complexion. Dr. Thosani says they can even help minimize issues such as keratosis pilaris (also known as “chicken skin.”)
  • Helps Products Absorb: When there’s less buildup sitting on the surface of your skin, products applied after showering—like body serums, creams, oils, sunscreen, and sunless tanners—are more easily absorbed. 
  • Makes Shaving Easier: Razors glide more easily over exfoliated skin. This is because dead skin cells don’t get caught in the blades, and because the skin is more smooth and even. 

How Often Should You Exfoliate? 

Generally speaking, aim for one to two times per week. That said, how often you exfoliate depends on the type of exfoliator you use and your skin type. “Dry skin, for instance, is skin that’s lacking oil and that skin type can be exfoliated one to two times a week without any negative side effects,” Lozina says. “Oily, thicker skin can be exfoliated every day with no negative side effects.” 

Gentle Exfoliation (e.g. micro-scrubs, loofahs) 

Gentle exfoliation can be as simple as using an exfoliating bar soap that has micro scrubbers or using a gentle mesh bath loofah. “These can safely be done daily as long as too much pressure is not used,” Dr. Thosani says. 

Chemical Exfoliators (e.g. acids, enzymes) 

Chemical-based exfoliators, like those formulated with alpha hydroxy and beta hydroxy acids (AHAs and BHAs) or enzymes, are best used once every week or two depending on the potency and your skin type. Follow the on-label instructions when in doubt, and pay attention to your skin’s reaction. 

Firm Physical Exfoliation (e.g. scrubs, dry brushing) 

Physical exfoliators packing a bit more gusto should be done no more than per week—especially if firm pressure is used, Dr. Thosani says. She adds, “These can cause irritation and worsen dryness if not followed up by applying an emollient cream to restore the moisture and heal the skin barrier after performed.” 

Read More

Everything You Need to Know About Showerhead Filters, According to the Pros

Ever moved or traveled and the shower water is completely different? We’ve all been there leaving the shower with your skin and hair feeling drier than when you hopped in the shower. Meet: filtered showerheads. They remove the damaging chemicals and minerals in water, so you can reap the benefits of a healthier skin barrier, smoother hair, and much more.

TL;DR: If you want hydrated skin or healthy hair, you should invest in a filtered showerhead for cleaner shower water. We talked to board-certified dermatologists to get the rundown about shower filters, from its benefits to the best products you can shop.

What Is a Showerhead Filter?

“A showerhead filter is a filtration device that fits on the shower that cleans out minerals, chlorine, and other chemicals,” explains Dr Kiran Mian, FAAD, board certified medical and aesthetic dermatologist at Hudson Dermatology and Laser Surgery. The minerals in water can damage skin cells, block pores, and form free radials.

This acts as protection for your skin and hair from damaging minerals found in shower water. “Filtered shower heads work by passing water through a filtration media to reduce concentrations of chemicals and irritants,” says Dr. Carolyn Stull, MD, FAAD, is a board-certified dermatologist. With the help of a filtered showerhead, these chemicals are removed and allow for healthy, hydrated skin and hair. 

Showerhead Filter Benefits

Skin

“Hard water is water that contains high concentrations of minerals including calcium and magnesium, which can leave a filmy residue on the skin that can clog pores and lead to irritation,” says Dr. Stull. By using a filtered showerhead, it improves the quality of water leaving the skin cleaner, softer, and less irritated.

According to Dr. Mian, while chlorine is helpful in keeping our water clean, it strips the skin of its natural oils, so this can cause irritation and conditions such as eczema and acne. If you suffer from skin conditions or sensitive skin, a filtered showerhead can help improve and hydrate the skin.

Hair

The chemicals in hard water can irritate and dry out the hair, especially if you have colored hair. Not to mention that buildup on the scalp and hair can occur due to the minerals and chemicals found in showerhead water. Dr. Stull recommends using a filtered showerhead with a clarifying shampoo to break down mineral buildup caused by hard water.

“To find out if there is hard water in your area, you can search online databases based on your location or order an at home test kit,” explains Dr. Stull. If you have hard water in your area, it is suggested to use a filtered showerhead to reduce chemicals and impurities in water.

How to Use a Showerhead Filter

Most filtered showerheads are suitable for your current showerhead, handheld, or wall-mounted shower fixtures. Grab your wrench and some plumber’s tape for installation. Typically you can install the filter between the shower mount and hose.

“You can buy a showerhead with a built-in filter or a device that fits on your showerhead that filters the water,” says Dr. Mian. For showerhead filter maintenance, carbon filters usually last for four to six months before needing to be replaced.

Best Showerhead Filters to Try

  • Canopy Filtered Showerhead: Love aromas and essential oils? The Canopy Filtered Showerhead ($125; getcanopy.co) can be personalized with different aroma oils to filter and infuse the shower.
  • Jolie Filtered Showerhead: If you’re trying to make your shower aesthetically pleasing, try the Jolie Filtered Showerhead ($148; jolieskin.co) that has an aesthetic design and is vetted by Dr. Stull. It improves your skin, hair, and wellbeing by removing chlorine, heavy metals, and other contaminants from your shower water.
  • Brondell Filtered Showerhead: This Brondell Filtered Showerhead ($51.40; amazon.com) is another affordable option and has a chrome finish. Dr. Mian says this option is very effective for filtering shower water.
  • VOESH Vitamin C Shower Filter: Calling all aromatherapy fans, this VOESH Vitamin C Shower Filter ($29; amazon.com) is a budget-friendly shower filter option with Vitamin C and aromatherapy. The Vitamin C removes chlorine and other impurities from hard shower water.
  • Mist 8 Stage Aluminum Shower Filter: This Mist 8 Stage Aluminum Shower Filter ($37.99; mistfilters.com) reduces the risk of exposure to harmful substances. “Mist is really good at removing minerals and heavy metals like iron, copper, magnesium, and mercury,” says Dr. Mian.


Read More

The 50 Best Amazon Deals Happening This Easter Weekend—Up to 81% Off

Missed Amazon’s Big Spring Sale last week? No worries—there are so many great deals still happening this weekend with discounts up to 81 percent off. 

This Easter weekend, you’ll find tons of stellar Amazon deals on home, kitchen, and fashion products, starting at just $10. Markdowns on items include seasonal finds like air purifiers and heeled sandals as well as everyday picks like stick vacuums, kitchen knives, and headphones. And of course, there are so many popular brands included in the holiday weekend sale, like Apple, Dyson, Bissell, Kate Spade, J.A. Henckels, and Tommy Hilfiger. 

Best Amazon Easter Weekend Deals Overall

Levoit Core 400S Smart Air Purifier

Amazon


Seasonal allergies are no joke, and if you suffer from sniffling and sneezing all spring long, you might want to consider getting an air purifier. This popular Levoit air purifier is a great option because it eliminates pollen, pet dander, and dust circulating in the room via its three-filter design. The smart device can be controlled with an app on your phone to program a weekly schedule or set it on a timer. It even displays the current air quality in the room, so you can ramp up the fan speed when you need it. 

Apple AirPods Pro

Amazon


If you’re tired of lugging around over-the-ear headphones, these Apple AirPods Pro deliver all of the sound without the bulk. The noise-canceling earbuds eliminate the sounds around you while working or reading, but also have a transparency mode for safety while commuting or exercising outdoors. Speaking of working out, these AirPods are water and sweat resistant, and have no-budge silicone tips, so you can go all out and not worry about a thing. 

Grande Cosmetics GrandeLash-MD Lash Enhancing Serum

Amazon


A Real Simple reader-favorite, the Grande Cosmetics lash serum is still on sale a week after Amazon’s spring shopping event. In fact, the best-seller was bought more than 40,000 times in the past month and has more than 33,800 five-star ratings from shoppers who swear it made their lashes “undoubtedly fuller and longer” with daily use. The serum is formulated with Isopropyl Cloprostenate for growth in addition to hydrating ingredients like grape seed extract, radish root ferment, and hyaluronic and amino acids. A little goes a long way, and reviews confirm that they saw results after two or three months. 

Best Amazon Home Deals

Amazon


Home decor, bedding, and appliances are all marked down this weekend with deals starting at $16 right now. Score home items from popular brands, including best-selling Yankee Candles, popular Levoit air purifiers, and top-rated Conair clothes steamers. Plus, save big on nifty storage finds that’ll help transition your home from winter to spring, like fabric clothes storage bags  and tiered under-the-sink organizers.  

Best Amazon Cleaning Deals

Amazon


Spring cleaning is in full effect, and if it isn’t, these tools from Hoover, Bissell, and Dyson will help you get started. One Bissell cleaning item Real Simple readers can’t stop buying is the Little Green Portable Carpet Cleaner that removes stains and grime from couches, car seats, and rugs. Other deep-cleaning musts include the popular Labigo electric spin scrubber, Shark’s Lift-Away upright vacuum, and iRobot Roomba’s robot vacuum. 

Best Amazon Electronic Deals

Amazon


Tech gadgets to improve your home security, listening experience, and office are all marked down with prices starting at just $10. Several Apple products are on sale in addition to the aforementioned AirPods Pro, like AirTag packs and AirPods Max headphones. You’ll also find editor-loved Ring Video Doorbells that let you see who’s outside on your phone as well as Amazon’s Echo Dot smart speakers that play music, control other smart devices, and even update you on the weather.    

Best Amazon Kitchen Deals

Amazon


Whether you’re looking for cookware, kitchen appliances, or gadgets, you’ll find most of them on sale now—and the eight below are some of the most popular ones around. Real Simple readers were really into this single-serve Keurig coffee maker as well as this now-$98 food vacuum sealer during Amazon’s Big Spring Sale. Other top-selling products include these pasta bowl plates that are great for big salads, noodles, and stews. You can also save on Ninja air fryer ovens, Fullstar vegetable choppers, and Lodge cast iron grill pans, too.  

Best Amazon Fashion Deals

Amazon


There’s no shortage of fashion deals this weekend, with many from top-tier brands you already love. Pretty, elegant faux wrap dresses from Dkny and denim midi dresses from Tommy Hilfiger are part of the list, as well as this Amazon-favorite two-piece lounge set that’s on sale and has an additional coupon. Multiple Kate Spade accessories are also on sale, including this compact Leila flap crossbody and this work-appropriate Harlow bag. You can also refresh your shoe inventory with options ranging from Steven Madden heeled sandals to classic Adidas Grand Court sneakers.  

Want to see what else is on sale at Amazon this Easter weekend? Browse the rest of these top deals below. 

Yankee Candle Lemon Lavender Classic Large Jar Candle

Amazon


Dyson V8 Cordless Vacuum Cleaner

Amazon


Labigo Electric Spin Scrubber LA1 Pro

Amazon


Lvetek Five-Outlet Surge Protector Wall Charger

Amazon


Keurig K-Express Single Serve Coffee Maker

Amazon


J.A. Henckels Statement 12-Piece Knife Block Set

Amazon


Zesica Long-Sleeve Top and Pants Loungewear Set

Amazon


Read More

Here’s What to Do About a Pimple Inside Your Nose

Breakouts can be frustrating, but some breakouts more so than others. One of the most frustrating types of breakouts is getting a pimple inside your nose. Not only can it hurt, but getting rid of it (or even just getting to it) can be a real conundrum. But wait! Before you proceed to pop it, we asked dermatologists what they suggest.

How Did That Pimple Get There In the First Place?

Simply put, there’s a lot of reasons—but just as with any normal pimple, it comes down to a compromised skin barrier. According to Kenneth Mark, MD, cosmetic dermatologist, “Clogged pores, ingrown hairs, or inflammation of the hair follicles inside the nose can all cause a pimple.”

What Should You Do If You Get a Pimple Inside Your Nose?

While you might be tempted to mess with your pimple, it’s crucial to resist the temptation says Dr. Sanda Lee, a.k.a. Dr. Pimple Popper. “Nose pimples are particularly painful because the nose has lots of sensory nerve endings and the inflammation leads to swelling—and this leads to pain. It hurts to even touch it and move it around. It can be hard not to pick or rub your nose, but you should try to keep your hands off of it.”  Why? Ssqueezing and picking the area can end up making the problem worse. “This leads to a bigger pimple and more pain,” she says,

How to Get Rid Of a Pimple Inside Nose

Resist the urge to pop your pimple. Dr. Lee notes that you’ve got to wait it out until a whitehead forms. “This is a sign that your body is fighting off the pimple by sending its army of cells—like macrophages and neutrophils—to fight off the infection (likely bacterial) and literally push it out of the body. That’s why a painful, deeper red bump usually eventually comes to the surface of the skin and becomes a pustule. Or in this case, it comes to the surface of the inside of the nose, which is actually a mucous membrane.”

How to Prevent A Pimple Inside Nose

While it’s not abnormal for a pimple to form inside your nose on occasion, if it happens frequently, could be because you’re doing something wrong. “If you are prone to getting pimples inside your nose, a good thing to do is use a Q-tip and a topical prescription antibiotic ointment called Mupirocin ointment, which is good at eradicating staph,” says Dr. Lee. “As derms, we will often prescribe this for people to apply to the inside of their noses to help control the bacterial count.”

If you’re prone to pimples on the rest of your face, it’s important to keep acne-causing bacteria at bay to curb the spread. Dr. Lee suggests using SLMD Salicylic Acid Cleanser. “Combine this with the SLMD BP Lotion, which is formulated with benzoyl peroxide to combat acne-causing bacteria on your face that might potentially spread into your nose.”

What Should You Do If Your Pimple Doens’t Go Away

If it’s been a few days and your painful pimple has popped yet, have a professional look at it and make an appointment with your dermatologist. 

Read More

What Is a Makeup Primer—and Do You Really Need One?

When we talk about primer, your mind probably wanders to a giant can of dripping house paint. Makeup primer is obviously its own thing, but it does operate similarly in the sense that it preps your skin and enhances the performance of everything you layer on top. Primers are considered an optional “bonus” makeup product—meaning you don’t technically need them to complete your look—but tons of makeup artists and beauty gurus swear by their powers. 

What Does a Makeup Primer Do? 

Makeup primers create a smooth and even canvas that helps your foundation, blush, and other products look more uniform and last longer. Many also boast additional benefits ranging from boosting moisture levels to minimizing the look of pores to absorbing excess oil throughout the day for a more matte look. 

“In makeup, primers can help you create a more refined surface upon which you can ‘paint’ with the makeup colors you want to create your own self portrait,” explains Matthew Waitesmith, a professional makeup artist and the founder of Artis. “The primer enhances the skin surface to best partner with the next layers of makeup for the aesthetic results you want.” 

When to Use A Makeup Primer 

You can use a makeup primer anytime you want, but there are some key scenarios when it really comes in handy. 

  • If Makeup Always Fades: Melissa Murdick, makeup artist for ColourPop, says that primer can come to the rescue if you find that your makeup fades or melts throughout the day.
  • For Big Events: Consider primer insurance on your makeup when you need it to stay put for big events like a wedding, presentation, or photographs.
  • When You Have Dry Skin: Those with dry or flaky skin can benefit from applying a makeup primer that moisturizes and locks in hydration. 
  • If You Have Oily Skin: A mattifying makeup primer comes in clutch if you find yourself dealing with slick skin midday. 
  • Your Pores Are Large: Makeup primers smooth out rough texture and minimize the look of lines and pores. 

Types of Makeup Primers 

You’ve got a handful of makeup primer formulas to choose from. All of them prep your skin and enhance application of additional makeup products, but different types can provide unique benefits. 

Blurring 

For that photo-filter effect, use a smoothing primer that creates a more blurred look and minimizes the look of fine lines, discoloration, and pores. “I personally have been using Benefit’s The POREfessional ($35, Sephora) and the Hourglass Veil Mineral Primer ($58, Sephora) for years,” Murdick says. 

Mattifying

If you’ve got oily skin, Murdick says there are mattifying primers that help reduce shine by absorbing excess oil throughout the day. Check out Milk Makeup Pore Eclipse Mattifying + Blurring Makeup Primer with Niacinamide ($38, Sephora) or JOAH Super Sidekick Mattifying Primer ($11.99, Amazon). 

Moisturizing 

“For dry skin, there are hydrating primers that will keep the skin feeling plump,” Murdick says. “If you’re looking for an affordable option to try, get the Colourpop Pretty Fresh Hydrating Hyaluronic Acid Primer ($12, Ulta).

Glow-Boosting 

Want an extra boost of glowy sheen? Murdick says to choose a product that not only boosts moisture, but offers an extra dose of radiance. We love Iconic London Underglow Blurring Primer ($30, Ulta) and Rare Beauty by Selena Gomez Illuminating Primer ($28, Sephora). 

How to Apply Makeup Primer 

Application is the same no matter what type of makeup primer you use. Waitesmith says to gently cleanse your skin and complete your skincare routine, including application of your toner, serum, moisturizer, and SPF. After the products have absorbed, follow up with a thin layer of your makeup primer and allow it to set a minute or two before going in with foundation and other makeup. 

“Splashing or misting your skin with a little water first will usually help the primer formula glide onto the skin more easily and evenly,” Waitesmith notes. “Having that extra moisture underneath the primer helps it create a more plump and even skin texture, as well.” 

If you experience makeup pilling, this is probably an indication that two products aren’t working well together. This often happens when you apply too much product, apply another product without waiting for the first to dry, and/or if you layer products that don’t “play nicely” with each other. For example, water-based and oil-based products repel each other, and some silicone-based products don’t agree with other silicone-based products.


Read More